2017 Feb 08
#coding
#pm
#tutorials
HyperText Markup Language (HTML) is the standard language for web pages and web applications. The language is written into a document that could be made in any type of word processing (i.e. textedit, notes), specialized webcoding application, or sometimes within a browser. That document is then saved on a webserver. A domain directs a visitor to that webserver and their browser renders the code. There is a basic structural semantic for levels of headings, paragraphs, sections, lists, everything. HTML is not meant to include stylization (font types, alignments, borders, everything). Adding that makes coding too unwieldly. The best way to work is with Cascading Style Sheets (CSS). Little bits of code in CSS can change the appearance of any number of elements throughout the pages of a website. Finally JavaScript makes cool things beyond my current level of experimentation. These three are the web triad, aka, the illuminati of the web.
These are tags:
< >
HTML is made up of elements which are not visualized and dictate to the browser how to render the content. This is an element:
<element>
This is a closed element:
</element>
Okay, now, how about we build a website? HTML documents need these things:
<!DOCTYPE html>
<html>
  <head>
    <title>bēstia.xyz</title>
  </head>
  <body>
    <h1>Welcome to the desert of the real.</h1>
  </body>
</html>
The "head" is where you place information about the site that will appear in the browser tabs. The body is for the content in the browser window. Post that to a webserver, point a domain, and it will render as a site. In fact, you can make a blank file, copy this content, name it with an html extension and then open it in a web browser. Most browsers will let you see the page source by right-clicking on the browser window. Go ahead, try it out. Congratulations, you are now self-actualized. Go out and do your great things.
Want a little more? Within the body you can write paragraphs:
<p>Remember... all I'm offering is the truth. Nothing more.</p>
Headings helps visualize hierarchy:
<h1>Free your mind.</h1>
<h2>Whoa.</h2>
<h3>I made this one tricky.</h3>
Free your mind.
Whoa.
Throughout human history, we have been dependent on machines to survive. Fate, it seems, is not without a sense of irony.
My headings have been customized with CSS. More on that later. Yawn... so much text, yet no images... try this:
<img src="system-failure.jpg">
There is a direct correllation between image size and page loading speed. Try to find tricks to reduce the image size as much as possible without rendering it ineffective. No image in this site is more than 100kb. The more experienced I get with parring down image size, I find most sizes are hovering around 50kb. For screen grabbing I use a straightforward free tool called Skitch. Then I use Photoshop, which works well because I can easily crop and edit an image before reducing the file size all within the same application. To do this, use the File>Save for the Web... command. Here are some basic settings I may use:
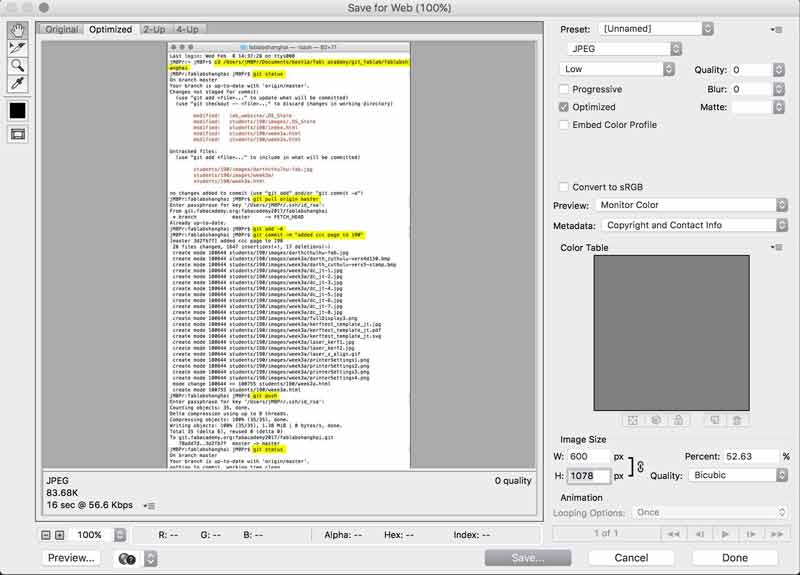
Adjust image size near the bottom (I tend not to go beyond 800px wide) and quality near the top. It all depends on the image: what level of clarity communicates the intention? I could push that number to 100 and add loading time or I could drop it to 0 because you probably do not care about the beauty of this particular image more than your time or the information it conveys. Another trick is to save a copy, drop it into your site for a test in the browser, then you may find you need to increasse or decrease the quality or size and can simply save over the top of the file you created with the mods. Then hit refresh on the browser and it will recognize the changes. And now links:
<a href="URL-goes-here.com">Link Title!</a>
Lists can be ordered or unorderd. "ul" is for unordered. "ol" is for ordered.
<p>My favorite types of cats</p>
<ul>
  <li>Hungry cats</li>
  <li>Playful cats</li>
  <li>Sleepy cats</li>
  <li>Wild cats</li>
  <li>Shy cats</li>
</ul>
To make the special little rectangles where I am placing the code examples, I use divisions. Anything within the div will be effected by the special rules applied to the div (typically through CSS, more on that later).
<div> </div>
Finally, you can add video like this:
<video width="320" height="240" controls>
  <source src="movie.mp4" type="video/mp4">
  <source src="movie.ogg" type="video/ogg">
</video>
For BIG videos, it may be preferrable to use a video serving site like vimeo or youtube and embed a player window from that server on your site. These two sites even give you the necessary code to do so. Cool...

The code for this site was written from scratch mostly. Other parts were copied from other sites and modified for this one. Btw, that is a really helpful way to learn. Find pieces of sites you like and look at the code. Copy and paste it into your site and play around with it. I used brackets. The application is free and open source. Goooooood. Built in are features such as auto completion, highlighting different bits of the code in differing colors, and a live preview through Google Chrome (illustrated in the screenshot below). In terms of design, I am aspiring towards the lowest common demoninator in terms of aesthetic, code complexity and straightforward ux.
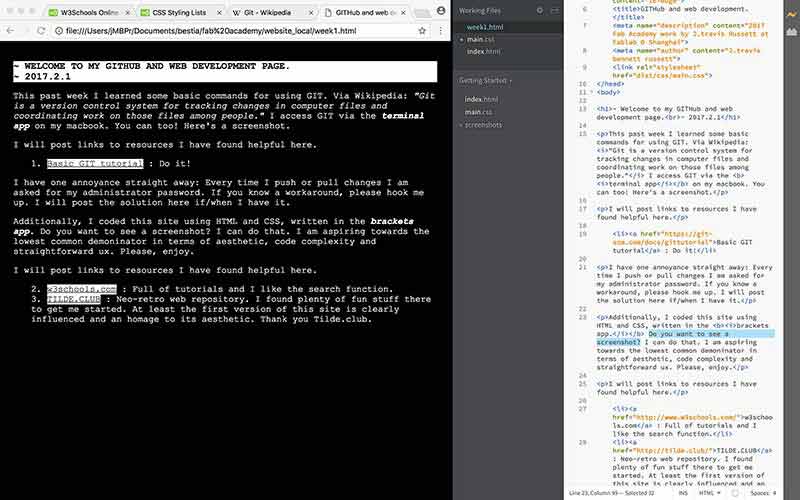
To ensure the live preview works properly, you need to avoid having errors in the code. The lightening bolt in the upper right hand corner should be yellow. Red is bad. Also, save your .html files somewhere on your own computer for editing. With brackets, point the application to that folder. File > Open folder...
I will post links to resources I have found helpful here.
- w3schools.com : Full of tutorials and I like the search function.
- UTF-8 Miscellaneous Symbols : List of codes needed for special characters like a snowman: ☃
- TILDE.CLUB : Neo-retro web repository. I found plenty of fun stuff there to get me started. At least the first version of this site is clearly influenced and an homage to its aesthetic. Thank you Tilde.club.
- neocities : Free web hosting, HTML editor built into browser, good company.
Share this post...
« Previous post :: Design, Materials and Methods
I would like to build a small moss (dominate) garden which has an electrical outlet of a contrasting color to green sitting on a small pole in the center. The electrical outlet is connected to a battery that is hidden in the base. The moss is organized in power modules which are connected and charging the battery. When something small is connected to the electrical outlet, the battery discharges electricity. The whole garden can be dissambled and reassembled with relative ease. A secondary objective is to make (most likely) independently powered monitoring equipment (lux, temperature, humidity, soil moisture, watt output)...
Next post :: Rhinoceros (for 2D things) »
Rhinoceros is a NURBS based modeler capable of freeform surfaces of fair complexity. The interface includes menus / buttons, a modeling window and command prompt. While rooting around the menus and buttons can offer new users introduction to the application's tools, I think the easiest and fastest interface is the command prompt: start typing in a command and the prompt will feed back optional tools. Many tools have dialogue boxes which appear when activated and drawing happens via a mouse or xyz coordinate input from a keyboard. Model elements are organized in groups, layers and blocks. The application supports an...