Rhinoceros is a NURBS based modeler capable of freeform surfaces of fair complexity. The interface includes menus / buttons, a modeling window and command prompt. While rooting around the menus and buttons can offer new users introduction to the application's tools, I think the easiest and fastest interface is the command prompt: start typing in a command and the prompt will feed back optional tools. Many tools have dialogue boxes which appear when activated and drawing happens via a mouse or xyz coordinate input from a keyboard. Model elements are organized in groups, layers and blocks. The application supports an impressive range of file types (import, export: i,o). Furthermore, Rhinoceros' capability can be extended through python scripts, plugins such as Grasshopper, a GUI for generative design tools, and on PC: RhinoScript, a scripting tool based on Micorsoft's VBScript language. I think there are some significant limitations to Rhinoceros. First, modeling history is linear without the grasshopper plugin. Grasshopper's GUI is similar to the graph interface of Antimony. Second, NURBS modeling can be extraordinarily difficult to achieve beyond a certain level of flexibility. My ultimate preference is to be able to use the best tool for the job, which means I need to know a variety of tools and often Rhinoceros works best. One clear advantage is Rhinoceros' ability to pull and quickly edit 2D information from 3D geometries. I will introduce some of the 2D commands.
I will highlight some of the elements of the GUI. Along the top are the menus and the on the left the main and secondary button interface. These both do largely the same things; it is a matter of preference. All the buttons can be clicked for a tool, or the left mouse button can be held for a second over a button to pull out a menu of deeper tools. Additionally, right clicking a button will bring up a smaller set of buttons in a separate window. Just above the modeling window, below the menus and to the left bottom are locational snap and directional restriction options. The right side of the modeling window presents the layer organizer on the top half and object-specific properties on the bottom. Along the top of each section are other dialogues that can be used. Just above the modeling window the current view can be changed to orthogonals and perspectives. Right clicking on the view name reveals a menu with view specific options. Default is to have a command prompt just above the buttons, in my case, I changed a setting to force the command prompt to open in a separate window whenever I begin typing. Many of the commands are similar to AutoCAD and many other versions of CAD.
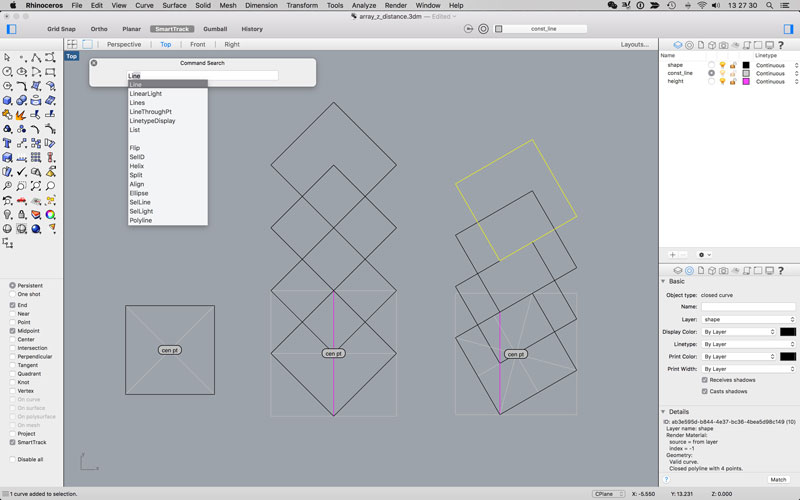
drawing:
point
circle
line
rectangle
polyline
curve

measurements:
length: length of line or curve
distance: distance between two points
area: area of a surface

geometric transformation:
move
copy
rotate
extend: make a curve longer
scale1D
scale2D
scale
mirror
offset: scale and copy
fillet: round sharp corners

2d to 3d and back to 2d:
planarSrf: turn a closed curve into a surface
loft: make connecting surface between two lines/curves
extrude
make2d: create 2d shape of selected surface, according to current view
unrollSrf: turn a volume into flat components
dupBorders: produce curve from boundary of a surface

cutting/expanding:
explode: separate segements of a curve/surface
join: make one curve/surface out of many segments
split: divides a line/curve/surface at a center point/line/intersective-surface/curve
trim: split + delete
extend
rebuild
curveBooleon

make many out of one:
divide: dividing lines/curves into equal parts
rebuild: either turn cuves into lines or make ugly curves pretty curves

housekeeping/getting-around:
group: locks objects together
ungroup
show/hide: select an object and temporary show it or hide it
zoom: opens many options for quickly recentering the camera
dot: useful for making notes inside the model
notes: a notepad contained within a rhinoceros file
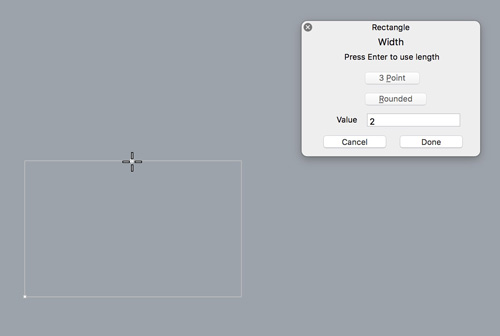
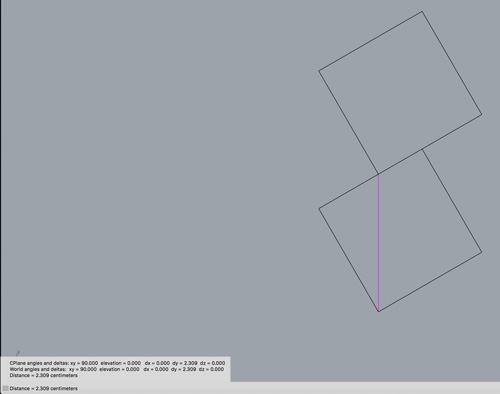
Upon entering a command, a dialogue will open to guide you through input. In this case, I drew a 2 x 2 rectangle by entering 2 for the length in the first direction, then 2 again for the other. Initially, I used this file to solve a measurement problem I was having in Antimony. After drawing the rectangle, which was representative of the elevation of one module of my test project, I rotated it to my desired angle: 30 degrees. Enter: rotate then 30. With "ortho" lock and the intersect snap, I can enter "copy", click on the bottom corner and drag the rectangle upwards until it snaps with the virtual intersection at the top of the module (for visual assistance). Finally, I used the "distance" command. Units were irrellevant, I only wanted to build an effective Antimony graph and Rhinoceros was an easy tool for quickly getting a 2D measurement.
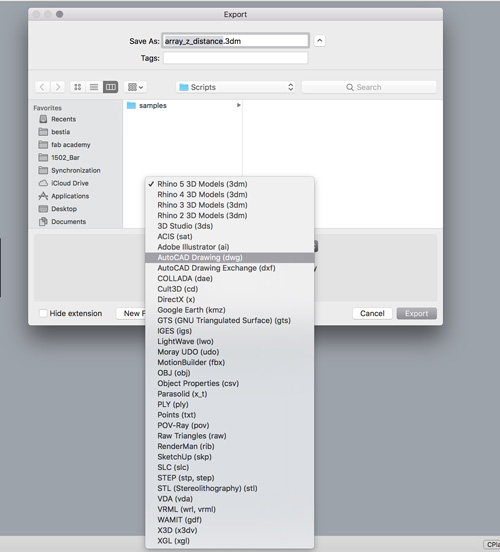
To export geometry, first select which pieces you would like to export. Then type in "export". Select the desired file type from the menu near the bottom.
I will post links to resources I have found helpful here.
- Rhinoceros Website : Download links (trial), tutorials, message board, plug-ins.
- RhinoScript : Open source community for sharing RhinoScipt, Python and Grasshopper scripts.
- Rhinoceros command list : List of commands and descriptions.
- Rhinoceros basic tutorials : Everything you need to start.
- List of basic Rhinoceros commands : Most of these are posted above.
- Project file : My Rhinoceros project file.
Share this post...
« Previous post :: HyperText Markup Language : HTML
HyperText Markup Language (HTML) is the standard language for web pages and web applications. The language is written into a document that could be made in any type of word processing (i.e. textedit, notes), specialized webcoding application, or sometimes within a browser. That document is then saved on a webserver. A domain directs a visitor to that webserver and their browser renders the code. There is a basic structural semantic for levels of headings, paragraphs, sections, lists, everything. HTML is not meant to include stylization (font types, alignments, borders, everything). Adding that makes coding too unwieldly. The best way to...
Next post :: Discussion »
Michael Reynolds : Earthship Biotecture Primavera de Filippi's Plantoid introduction.