Tags
- CNC milled wood frame
- Grow module | Design and fabrication
- Milling a composite mold
- Composites : Modular growth, testing
- Star puzzle : Child's play?
- Bioelectrochemical testing pod
- Prototyping the infinity axis
- Prototyping a belt axis
- Prototyping the effector
- Fabricating a gestalt stage
- Unravel : Mysteries, preparing a design to test 2-D milling
- Mathematica model..? (no)
- Performance testing MakerBot Replicator II
- Wild Cardboard : Fabbing, Branching, Versioning
- Grasshopper Parametric Modeling
- Fusion 360, introduction
- Rhinoceros (for 2D things)
- Antimony, introduction
Background
3-D generation and visualization softwares.
3-D Computer Modeling posts...
- CNC milled wood frame | 2017 Jun 28 | 5 minute read
- Grow module | Design and fabrication | 2017 Jun 13 | 7 minute read
- Milling a composite mold | 2017 May 12 | 8 minute read
- Composites : Modular growth, testing | 2017 May 09 | 2 minute read
- Star puzzle : Child's play? | 2017 Apr 25 | 5 minute read
- Bioelectrochemical testing pod | 2017 Apr 25 | 1 minute read
- Prototyping the infinity axis | 2017 Apr 23 | 5 minute read
- Prototyping a belt axis | 2017 Apr 23 | 3 minute read
- Prototyping the effector | 2017 Apr 22 | 4 minute read
- Fabricating a gestalt stage | 2017 Apr 04 | 6 minute read
- Unravel : Mysteries, preparing a design to test 2-D milling | 2017 Mar 14 | 3 minute read
- Mathematica model..? (no) | 2017 Mar 01 | 5 minute read
- Performance testing MakerBot Replicator II | 2017 Feb 25 | 4 minute read
- Wild Cardboard : Fabbing, Branching, Versioning | 2017 Feb 15 | 9 minute read
- Grasshopper Parametric Modeling | 2017 Feb 15 | 8 minute read
- Fusion 360, introduction | 2017 Feb 11 | 1 minute read
- Rhinoceros (for 2D things) | 2017 Feb 08 | 4 minute read
- Antimony, introduction | 2017 Feb 07 | 7 minute read
I would like to use 2 dimensional milling to cut a wood frame to carry the concrete grow modules and hide the electronics. There will be a small cut-out on one side for an LCD which will be displaying data coming from sensors across the system. The concrete casting process was not precise due to some flexure in the walls of the mold. Each module has an extra 4-5mm total width in both directions. So the first part of making the frame was to compensate for this error. I should note, I kind of like the little bit of error...
My idea is to first create a small modular testing garden. I began with some sketches on paper and Rhinoceros. The bioelectrochemical modules are red and the frame is purple. I think this way will be able to be broken down and assembled easily and can be grown or reduced by adjusting the array. While the sketch shows a six by six array, I might reduce it to five by five. The testing modules were essentially cubes. This module is has a smaller bottom half to create a lip for sitting on the structure. In the upper portion there is...
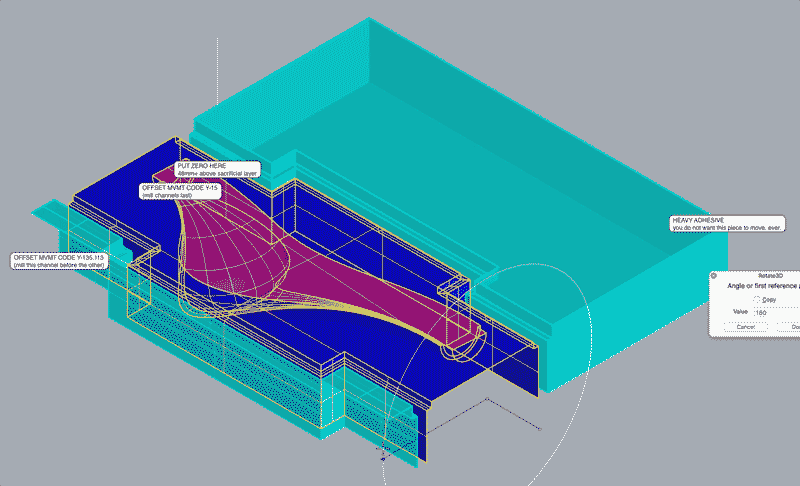
I am preparing a mold of four parts: two outside halves and two inside halves. Then I plan to make a burlap plus resin composite surface around the two inner halves. Finally, I use the outer halves to compress the composite as it cures. I have yet to try milling multiple surfaces from one block of material. Well, until today. The inner halves each require milling on two sides of the material. I sized the molds to the constraints of our lab's Roland MDX-40A benchtop CNC machine. The XY maxes are 305mm according to the manual. Z max is dependant...
Composite materials are made of two or more constituent materials, each with significantly different, yet complimentary, physical and or chemical characteristics. When combined into a composite, the team of materials is greater than the sum of its components. I started the project by mocking up a form in Autodesk Maya. The form is like bamboo in that it grows in sections and has openings to contain the moss. At this point, rather than spending much time modeling this object, I would like to jump into making composites becasue it is my first time. This is a little mockup of what...
For my niece's birthday, I three-d printed a star puzzle. The toy however could never be dismantled after I muscled it together due to poor printer calibration on my part (a running theme in this blog). Further, duplicating the toy many times over comes with the time factor of three-d printing. Hint : slow. So, I thought it would be fun and good proving grounds to revisit this project in this exercise. And, the other day she asked if I had made the better version of her toy yet and gave me no leniancy for time spent building my first...
I would like to begin prototyping grow modules for Pure Imagination. The first challenge is setting up a plant microbial fuel cell system for generating electricity with moss. This work will heavily rely on the scientific research from Paolo Bombelli, et al. I thought I could cast this pot... ...and thinking how to do that with ooloo is tough. I think slip casting or vacuum forming would be the easiest route. I have experience vacuum forming and more, and would have some concern with the finishing that would need to be done after pulling a form for this object. If...
Now we have an operational prototype. Now we have a barely operational prototype. We decided I would focus on the mechanics of the second prototype. I wanted to improve several aspects of the first prototype. One, the robot should be easily portable, which I think works best if it can be easily dissambled and assembled. Two, the wheels do not balance the robot. Three, the effector and stage should be customized to the dimensions and requirements of this robot. In this section I will focus on the wheels, or the (Y) axis, the infinity axis. First, Saverio found this video...
The Gestalt linear stage used a screw drive mechanic which we thought would be too limiting dimensionally for our purposes. Therefore, we decided to change this axis to a belt drive mechanic. I also wanted to see if this axis could be freed from the cardboard structure of the Gestalt model so it might have interchangeable rod lengths. I went about designing these pieces thinking three-d printing would be the optimal method because I could make non-planar things without worrying about connections and alignments. Three-d printing is slow. Three-d printing, however, is also passive which lets me focus on other...
The effector pushes the brush into the drawing surface and pulls it away. Included in the mechanism is the flow of water from the reservoir into the brush tip. This design uses a 2BBYJ-48 stepper motor we had in stock in the lab. Precision of movement is not needed. In the design of the stage, I left some gaps that could be used to attach an effector shield. We also looked at an effector designed by Simone Boasso previously. With these starting points, I designed this: I created a larger guide for the vertical movement with a perpindicular axis for...
After much intense strategic consternation, we decided to begin our project by developing through the Gestalt framework. The framework is developed; we are beginners. Can we connect rotary stages on either side of a linear stage equipped with a brush effector? The idea is similar to a common CNC machine. Wheels mobilize the whole assembly along an infinite X axis. A stage holding an effector moves a limited distance between two wheels (Y). The effector moves a minimal distance along the Z axis. The first step is to fabricate a linear stage. Download the Rhinoceros file and you may need...
I wanted to make a work that appeared to be a single surface looped around and around like a coil or a spring. I like to make things that use machines natural ease in replication as a starting point and then find ways to create variation or intrigue. It could be imagined that this one thing can be unwound into a long straight line or that this coiled state is the natural tendancy of the material. One important note: in this first prototype I plan to use machine kerf to make the plywood flexible in specific zones. In future iterations...
I am forever in awe of math derived computer geometries. I would love to learn how to write scripts that generate models in a CAD application soon. For the first draft, I decided it would be much faster to sketch a model based on visual cues and test it in a 3D printer. I used Autodesk Maya for this sketch. This little thing fits within a 35mm radius sphere. I am trying to push the tolerances of machine to an extreme here. The first pass I will try 1.2mm wall thickness with some temporary scaffolding. I am forever in awe...
The lab has a many 3D printers. I started with the MakerBot Replicator 2, which is a material extrusion printer which only uses Polylactic acid (PLA) plastic. "PLA is a biodegradable and bioactive thermoplastic aliphatic polyester derived from renewable resources, such as corn starch (in the United States and Canada), tapioca roots, chips or starch (mostly in Asia), or sugarcane (in the rest of the world)." Wikipedia The first operations are testing the limitations of the machine. ZhaoWei and I tested two models. The first, Zhaowei had on hand giving us time to draw the second while the machine printed....
Now the real adventure begins. In a perfect world this would fit together on the first cut. I am going to assume it is not a perfect world and rely on the flexibility of my parametric model to adjust to the imperfections. The first big challenge will probably be successfully bending, or maybe not. I do not have prior experience with kerf pattern flexure joints. If I clear the bending hurdle, the center joints along the ribbons will probably be tricky because I am having to make an assumption on how this will behave prior to building the model. Testing...
I decided to try learning the Rhinoceros parametric GUI plugin Grasshopper for the cutting prototype. The Grasshopper project's aim is to make programming easier to understand through an intuitive visualization. The GUI looks similar to Antimony with a model window and a graph window. Scripting nodes in Python, C#.net and VB.net is also possible. Grasshopper is available with Rhinoceros on MacOS and Windows. Launch Rhinoceros. Enter "grasshopper" in the command line. The Grasshopper interface will launch. Across the top are several tabs which contain links to "objects" which are scripts of varying complexity. The primary section of the screen is...
Fusion 360 seems like a powerful cloud based 3D modeler compatible with OSX, Windows and several mobile OSs. The advantage of the cloud based file structure is always having access to your files (assuming you have internet access, if not... ya screwed) and a built-in collaborative platform. Autodesk is hosting built-in cloud based fabrication and rendering tools as well. Many file types can be imported or exported, in fact, Fusion directly connects to McMaster-Carr's database and quickly pulls in any number of parts. The modeling mostly involves interfacing with a visual modeling window and is capable of setting reactionary relationships...
Rhinoceros is a NURBS based modeler capable of freeform surfaces of fair complexity. The interface includes menus / buttons, a modeling window and command prompt. While rooting around the menus and buttons can offer new users introduction to the application's tools, I think the easiest and fastest interface is the command prompt: start typing in a command and the prompt will feed back optional tools. Many tools have dialogue boxes which appear when activated and drawing happens via a mouse or xyz coordinate input from a keyboard. Model elements are organized in groups, layers and blocks. The application supports an...
Antimony is an open-source, relying on graph composition where nodes represent primatives, 2d shapes, and loads of customizable operations and functions. The graph has an GUI akin to Grasshopper, the infamous Rhinoceros plugin. Antimony's interface includes a 3d viewport which has limited modeling capabilities that automatically log into the graph and a script editor. The script editor enables customization of all the graph nodes and is going to require more time for me to grasp. The advantage here is the algorithmic nature of the modeling. Changes can easily be applied throughout the entire history of the graph and propagate throughout...