Tags
#electronics
#coding
#microCode
Embedded programming
- Environmental monitoring with online data logging to Thingsv
- Grow monitors | What watches the watchers?
- LCD x Arduino
- Programming "Hello to the World" with C
- Breathing light : An arduino experiment
- Datasheet Atmel ATtiny24/44/84
- Echo : Programming.c
- Programming a programmer
- Arduino IDE, introduction
2017 Mar 21
#electronics
#coding
#microCode
Datasheets are hardcore product manuals for instructing makers on how to integrate specific products (ie electronic components) into systems. Datasheets are typically created by the product manufacturer and include technical and performative characteristics, connectivity information, coding examples, etc.
A datasheet for an electronic component, such as an MCU like the ATtiny44, typically contains the following:
- Feature list and overview
- Pin configurations and descriptions
- Timing diagrams
- Reset and interrupt handling
- Register description
- Memories details
- Input/output informations
- Clock system
- Power management
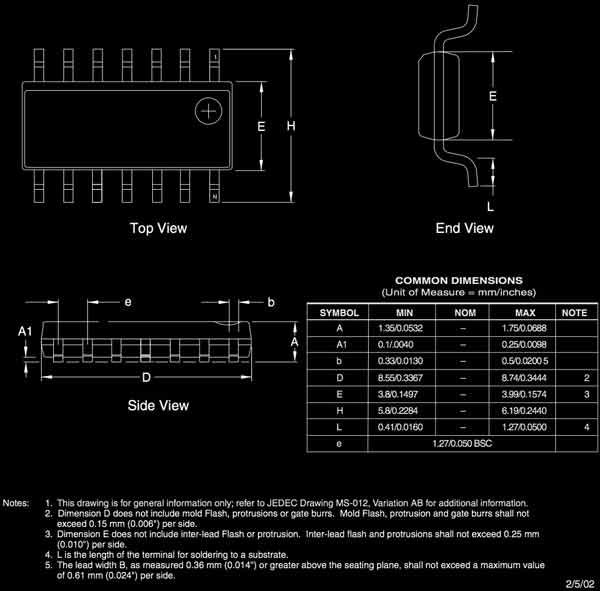
- Packaging details and configurations
- and much more!
This is the first time I have read a datasheet and I have only a handful of hours of experience working with electronic components physically and digitally. Following I pulled out some informations that grabbed my attention and diagrams. I like diagrams.
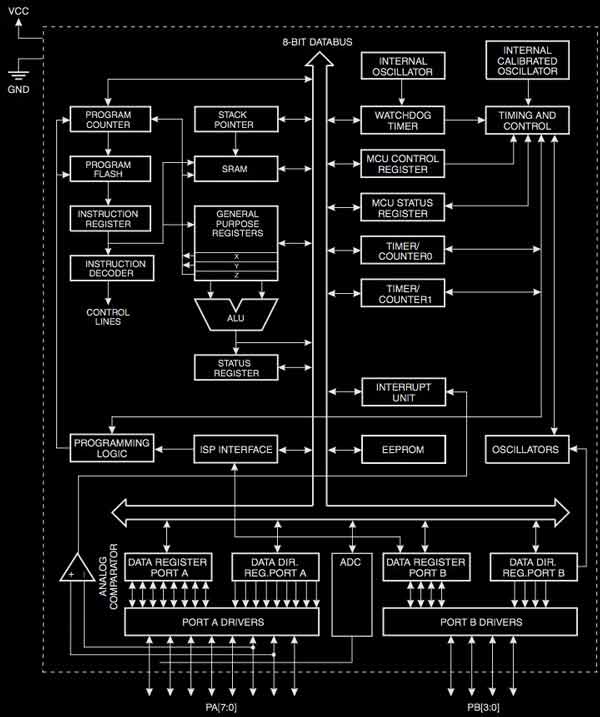
The ATtiny24A/44A/84A provides the following features: 2K/4K/8K byte of In-System Program- mable Flash, 128/256/512 bytes EEPROM, 128/256/512 bytes SRAM, 12 general purpose I/O lines, 32 general purpose working registers, an 8-bit Timer/Counter with two PWM channels, a 16-bit timer/counter with two PWM channels, Internal and External Interrupts, a 8-channel 10-bit ADC, programmable gain stage (1x, 20x) for 12 differential ADC channel pairs, a programmable Watchdog Timer with internal oscillator, internal calibrated oscillator, and four software select- able power saving modes. Idle mode stops the CPU while allowing the SRAM, Timer/Counter, ADC, Analog Comparator, and Interrupt system to continue functioning. ADC Noise Reduction mode minimizes switching noise during ADC conversions by stopping the CPU and all I/O mod- ules except the ADC. In Power-down mode registers keep their contents and all chip functions are disbaled until the next interrupt or hardware reset. In Standby mode, the crystal/resonator oscillator is running while the rest of the device is sleeping, allowing very fast start-up combined with low power consumption. -pg.5
ATtiny24A/44A/84A are low-power CMOS 8-bit microcontrollers based on the AVR enhanced RISC architecture. By executing powerful instructions in a single clock cycle, the ATtiny24A/44A/84A achieves throughputs approaching 1 MIPS per MHz allowing the system designer to optimize power consumption versus processing speed. -pg.4
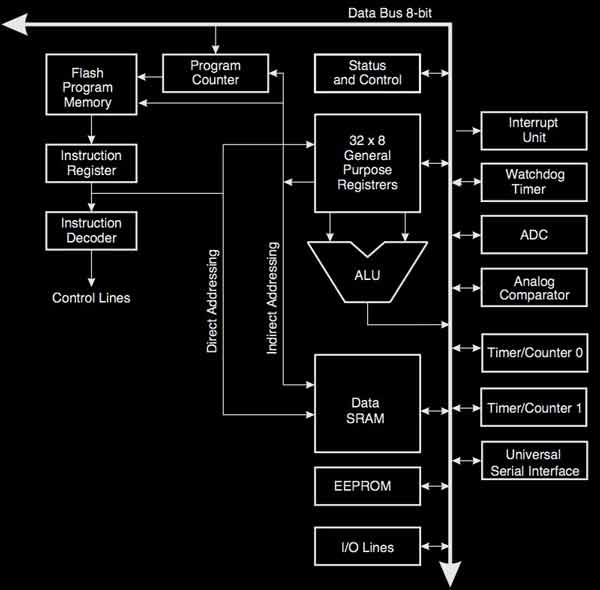
The AVR core combines a rich instruction set with 32 general purpose working registers. All 32 registers are directly connected to the Arithmetic Logic Unit (ALU), allowing two independent registers to be accessed in one single instruction executed in one clock cycle. -pg.4
Block diagram:
Packaging drawing:
In order to maximize performance and parallelism, the AVR uses a Harvard architecture – with separate memories and buses for program and data.-pg.7
Block diagram of the AVR architecture:
The parallel instruction fetches and instruction executions diagram:

Single cycle ALU operation diagram:

Clock distribution diagram:
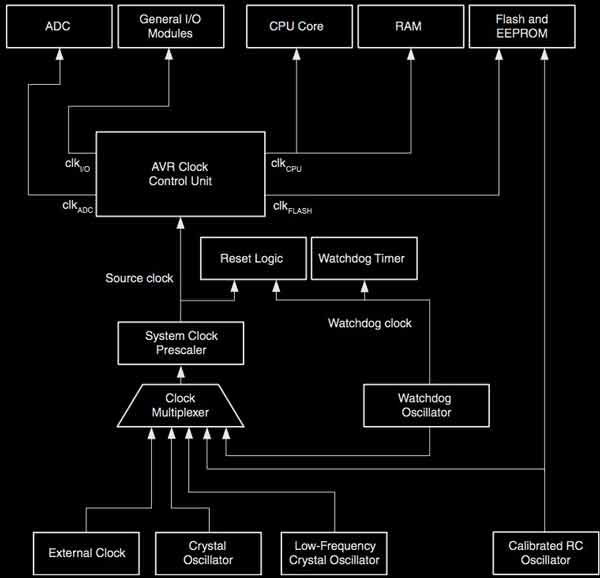
XTAL1 and XTAL2 are input and output, respectively, of an inverting amplifier which can be con- figured for use as an On-chip Oscillator. Either a quartz crystal or a ceramic resonator may be used. -pg.28
Crystal oscillator operating modes diagram:

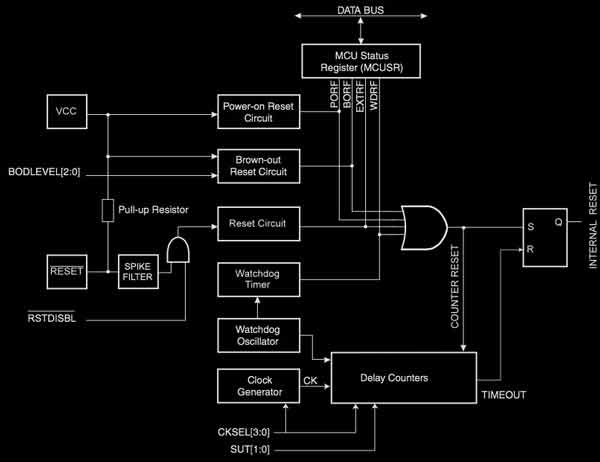
Reset logic diagram:
I will post links to resources I have found helpful here.
Share this post...
« Previous post :: Echo : Programming.c
I am testing the assembly of the board by attempting to program it using C... for the first time. Start by downloading the Makefile and the echo hello-world C program written by Neil Gershenfeld. To make things simpler, rename the *.make file to simple "Makefile". No extension. In MacOS the best way to do this is in the file information dialogue. Open the Makefile with a neutral editor, such as Textedit to learn about its setup. The first group of lines refer to the project name, the source of the project (echo hello-world C program), the Micro-controller (ATtiny44), and the...
Next post :: Breathing light : An arduino experiment »
I now have a grasp of making slight adjustments to code and uploading code to my board. Now that I have a little taste, I want more, so I imagined a simple idea to go a step beyond the tutorials and example codes. An interesting thing to me about coding is how the process is not linear, like what can often happen in other design fields. I can start layering in code and then make a little game of optimizing that code for editing, total number of executions, or number of lines, for instance. In fact, speaking of games, I...